

The wind it whooshed, the snow it whirled,
The rain streamed down; it sloshed and swirled
And washed the colors from the world.
Is that not a perfect description of this winter? February seems to be lasting forever, surprising for the shortest month of the year. It's been the wettest winter in decades, and I find myself day-dreaming longingly about beaches, flip-flops, and sun.

Sun Bread by Elisa Kleven

So when I found this book about a winter-weary town, I knew it would be the perfect way to finish up our week in the kitchen. In a town blasted by winter's fury, a baker decides "because the real sun likes to hide, I'll make my own small sun inside." She mixes up the dough and bakes the bread, and it's warmth and light draw all the weary townspeople into the bakery for fun and revelry. They make so much noise, the sun wakes up from her sleep and begins to eat the bread the townspeople throw her. She beams her thanks down on the land:
It painted colors on the day,Melted all the snow away,And brought the shadows out to play.
Kleven's drawings are fanciful and colorful without becoming garish. She fills the town with elephants, goats, bears, ducks, monkeys, zebras, and more animals both exotic and common. The rhyming is awkward in parts, but some of her imagery is lovely and as descriptive in themselves as the illustrations.
The book includes a recipe for the bread which was time consuming, but oh-so-worth-it!
Recipe for Sun Bread
Ingredients:
- 3 eggs
- 3 T sugar
- 2 cups flour
- 1 stick butter, melted
- 2 pkg active dry yeast
- 3 T milk, lukewarm
1. In a small bowl combine the yeast and milk. Let stand until the mixture is foamy, about 5 minutes.
2. In a (different) small bowl, mix eggs and sugar together.
3. In a large bowl, combine the flour and melted butter.
4. Add the egg mixture to the flour mixture and beat well.
5. Add the yeast mixture to the batter and stir.
6. Knead the dough for 8-10 minutes on a greased, floured surface. I know! 10 MINUTES! Count it as part of your cardio for the day. With all the butter that's in this bread, you'll need it! (or knead it? ha!)
7. Place the dough in a greased bowl and cover with a cloth. Set to rise in a warm place for about an hour or until doubled in size.
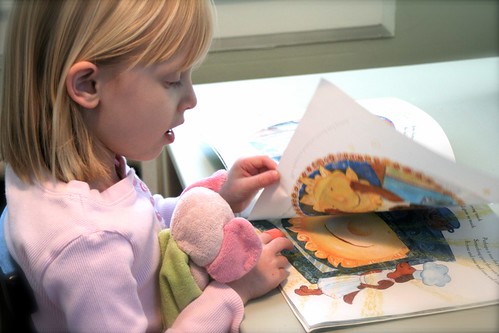
8. Punch down the dough and knead for a few more minutes. I asked E to read me the book during this part. There are definite benefits to having an early reader! And, yes, that's Ellie in her arms. I'm all bark and no bite.
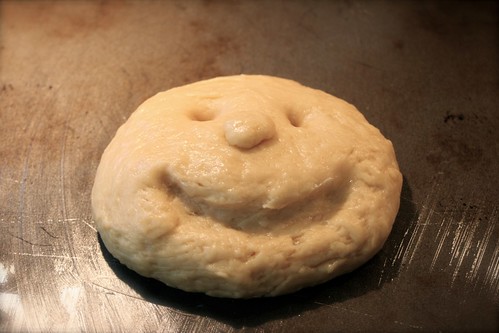
9. Divide the dough into two portions. Take the first and form into a flattened ball for the body of the sun. Place on a greased cookie sheet. Punch two eyes and a mouth with your fingers. Make sure you make them deep! Ours weren't quite deep enough. Add a small ball of dough for the nose.
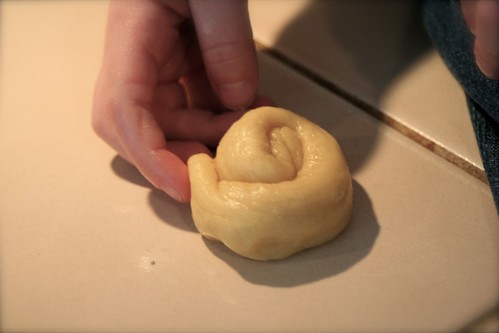
10. Divide the remaining dough in half. Take one half and cut into 5 pieces. Now put your best preschool skills to work by making 5 long snakes.

11. Curl the snakes into snail coils and place around the sun to form half of its corona.
12. With the remaining dough, form 5 puffy triangles and place around the sun. The result should look something like this.
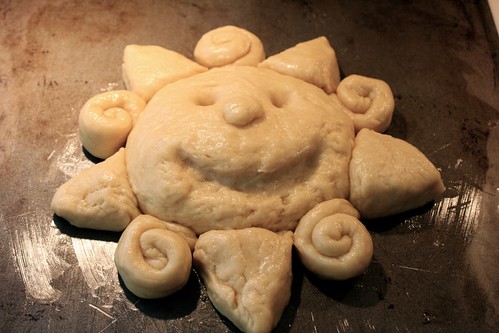
13. Cover the sun and let it rise again for another hour.
14. Bake at 400 degrees F for about 20 minutes.
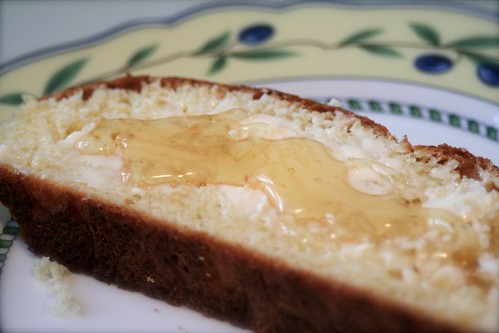
The smell of this bread is heavenly! I was so disappointed when my never-at-the-right-temp oven started to burn the bread just 15 minutes in. Even so, the texture of this loaf was light and fluffy and the taste was, well, not quite as delicious as a day in the summer sun... but almost.
I'm linking up with:
- What my child is reading (Mouse Grows Mouse Learns)
What a cheerful sunny bread!
ReplyDeleteBeautiful bread, we'll have to check out that book, too! And I left you an award at http://almostunschoolers.blogspot.com/2010/02/beautiful-blogger-and-sunshine-awards.html
ReplyDeleteOoh, this looks so yummy, and I have never heard of this book. Thanks for linking up this week - I am looking forward to learn more about your adventures.
ReplyDeleteThese are so cute! And they look good to eat, too!
ReplyDeleteI am impressed that your daughter can read this book herself (and this was back in February!). My son is entering first grade and could read some, but not all of the book.
ReplyDeleteI love your detailed photos of the bread process.