Showing posts with label fancy nancy. Show all posts

March 18, 2010

A Fancy Feast!


After a make-over, accessorizing, and a fashion show, our guests at E's Fancy Nancy birthday party were more than ready for lunch!


Although the set-up was fancy, I kept the menu simple. 5-year-olds are not known for their adventurous palate, so I stuck with classic favorites. Heart-shaped PB&J sandwiches supplied the main course with sides of strawberries, carrots, and pretzels. Pink lemonade was served in "crystal" glasses with heart-shaped cranberry juice ice cubes. 


The ice cubes and lemonade were the talk of the table. If you'd like to make your own, Target had heart ice cube trays in their dollar section during Valentine's Day, and Ikea usually carries them year-round.


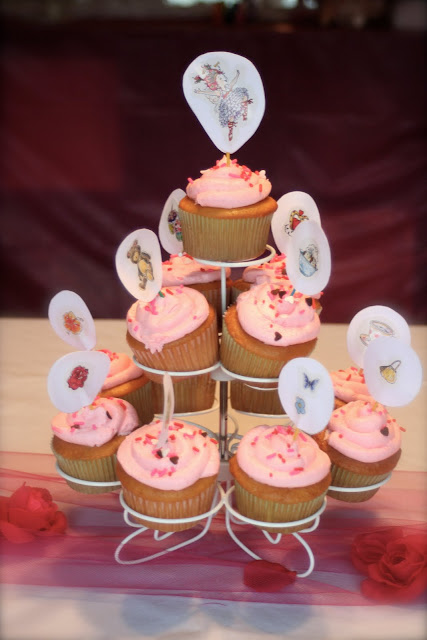
For dessert I made fancy cupcakes the only way I know how... use a ziplock bag to pipe frosting in a swirl pattern. I used a cake mix, but as always I made the buttercream frosting from scratch. It's a basic vanilla icing, but I added food coloring to make it pink. Sprinkles left over from Valentine's Day cupcakes worked perfectly to add a little pizazz.


E's "Grandma Ji-Ji" (my husband's great Aunt Jean) gave her a Fancy Nancy sticker book for her birthday. I made good use of a few of the 600 stickers to create these cupcake toppers.


I'm afraid there was nothing particularly fancy about how quickly these cupcakes were gobbled up!


Check back tomorrow when I'll have a few more tips and tricks about throwing the perfect Fancy Nancy birthday party!

March 17, 2010

Fancy Nancy Party - Accessorize!


Little girls seem born with a desire to look and feel beautiful. At E's Fancy Nancy party, we did our best to help them feel as lovely outside as they already are inside. How? By accessorizing, of course! (It's the Fancy Nancy way.)


At La Salon, I applied the eye shadow color of their choice. Q-tips let me buy just one sample pack of eye shadow for all the girls. Each child was allowed to pick out a lip gloss to keep, and I applied a very light coat to their lips. (Minutes later - once they had the lip gloss in their own hands - nearly every girl looked like Ronald McDonald.)

While I played makeup artist, my mother-in-law gave the girls manicures. Again, we let them pick from several nail polish colors.


At the same time, my mom assisted girls in picking out a feathered boa.


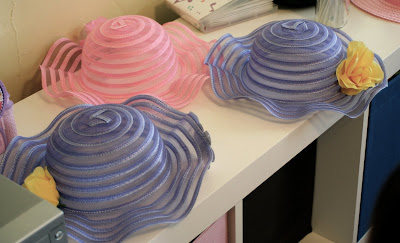
Then they were asked to take a bangle from the top of the Eiffel tower, a jeweled ring from the bowl, a hat and a flower. My mom hot glued the flower onto the hat and then wrote the girl's name on the inside of the rim. (The boas and bangles were from the Dollar General. I found the basic straw hats and silk flowers at The Dollar Tree, and the ruffly hats at Target's dollar spot.)


I would have loved for the girls to cover the hats in lots of flowers, but it was too time-consuming with the hot glue gun. Many of the girls chose to wrap their boas around the rim of the hats, which worked great and looked fabulous.


When the make overs were complete, I sat all the girls down and let them take turns walking the "runway," pausing for me to take a picture of each of them while everyone cheered. I later used these pictures to make our thank you notes.


Doesn't the birthday girl look gorgeous? Wouldn't Fancy Nancy be proud? She - and the other children - had a blast getting dressed up and playing with make-up. I heard several times, "my mom never lets me do this!" After the fashion show they had worked up quite an appetite. Check out all my posts this week for menu ideas, decorations, and other tips for throwing the perfect Fancy Nancy party.

March 16, 2010

The Fanciest of Birthdays: Setting the Scene

When I suggested to E that we do a Fancy Nancy party - and she agreed - I was thrilled. I love Fancy Nancy books. They are heartwarming, educational, and oh-so-cute. They make me sad for my friends who have all boys. :) So you can imagine the exhilaration (that's a fancy word for excitement) I felt while decorating for the party!


I covered a bookshelf in our dining room with a pink plastic tablecloth I found for $.39 in the clearance section of Walmart to create La Salon. The feathered boa and tiara were dollar store finds and the flowers were re-purposed from my father's funeral. (I think he would have gotten a kick out of that!) And, of course, the book is proudly displayed.


Marabelle Lavinia Chandelier (aka A's ballerina doll) also found a seat of honor, along with a sparkly E I found at Michaels and a strand of "pearls" I already had. The mirror - perfect for primping - was simply propped against the wall.


What's a Fancy Nancy party without a touch of Paris? Thanks, Beth, for the Eiffel Tower loan!


The Patisserie was elegantly decorated with an old sheet for a tablecloth (hey, these are 5 year olds!) and pink tulle sprinkled with silk roses (from the dollar store) to form the runner.


To create our fashion show stage, I hung a vintage (that's a fancy word for old) tablecloth from our bookshelves and decorated with sparkly hearts, another Walmart clearance find.


Come back tomorrow to find out how 8 fancy little ladies became even fancier!

I'm linking up with:
- DIY Day @ A Soft Place to Land
- Ready, Set, Vignette! @ The Stories of A to Z

March 15, 2010

How to Design the Perfect Invitation


We finally threw our Fancy Nancy party! Despite needing to change the date (twice), we had 8 lovely little ladies come to help us celebrate. This week I'll be sharing with you all the little details that made our party a success, starting with the invitation.


In my past life I was (and still am, albeit very part-time) a graphic/web designer. I use Photoshop for most of my design work, but much of this you could do with any design program, including PowerPoint. Here's how I designed this invitation...


1. Google what is already out there.
Google Images is a great place to start. I typed in Fancy Nancy invitation and was greeted with hundreds of examples. I modeled mine off of another invitation I found at fancyink.blogspot.com. I really liked her polka dot border, so I googled pink polka dot pattern. I set the image I found as a pattern and filled in the rectangle, layering smaller yellow and white rectangles to finish the border.

2. Scan images from the book.
If possible, look for images that are already surrounded by white space, making it easier to crop. This picture of Fancy Nancy jumping was perfect. You always want people facing into your design, so flip the image if necessary.

3. Use free clip art or stock images when you can.
I didn't need to use them this time, but I wanted to share with you my favorite stock photography site: Stock.XCHNG. The site is a community of photographers who willingly give their work for free use. It's now owned by Getty Images, but the images are still free once you sign up.

4. Choose a fun font.
There are oodles of free font websites out there, my favorite two being urbanfonts.com and dafont.com. I looked for two different fonts, one that mirrored the "NANCY" on the cover of the book and one that mimicked the distinctive writing inside the books. Always put the essential part of the invitation (time, place, etc.) in a clear, basic font.

5. Be creative with your wording.
Again, this is where googling other similar-themed invitations came in handy. I found the "Ooh La La!" and the "soiree" reference on other invitations, as well as the "have your mommy call my mommy."

6. Save as an image and print out from MS Word.
Whatever program you create your invitation in, you should be able to export as a jpg or tiff. Just try file->save as. If not, try hitting "print screen" on a PC and "command-shift-4" on a mac. This will create an image file of your screen that you can then place in Word, crop, and resize.

If graphic design isn't your thing, don't worry. The rest of the week I'll be going over completely analog methods of decorating and throwing the perfect Fancy Nancy party! 

Edited to add: Here's a blank invitation if you'd like to save the file and use for yourself. Just click on this image to view the large file. Right click and hit save as!


I'm linking up to:


More Fun...

Related Posts with Thumbnails